|
<< Click to Display Table of Contents >> Observation Data |
  
|
|
<< Click to Display Table of Contents >> Observation Data |
  
|

Observation Data Screen
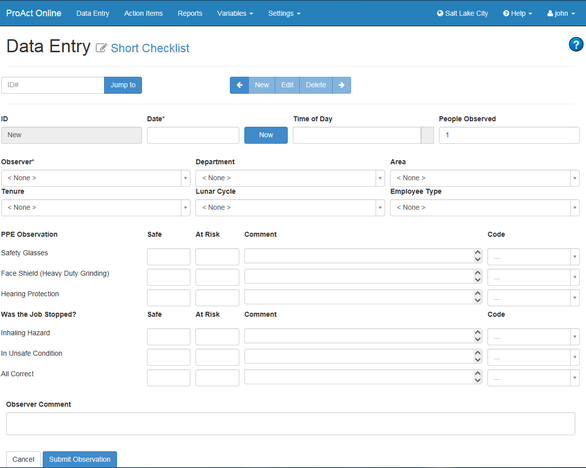
The Observation Data screen is used to enter, edit, and delete observation data. When opened, the screen defaults to a new, blank observation record ready for data entry.
This screen is arranged automatically based on the configuration of the software and includes a number of elements:
Checklist Selector
The currently selected checklist will be displayed at the top of the screen. Click the hyperlink to change the checklist. A screen will appear with a drop-down list of all available checklists.
Navigation Buttons
The navigation buttons are displayed across the top of the Observation Data window.
![]()
| • | Previous Record moves to the last/previous record in that was entered in the system. Users without special permissions will see only data they entered and not other user's data. |
| • | Next Record moves to the next record in the observation list. This button will be disabled unless there is a next record. |
| • | New creates a new, blank observation record. |
| • | Edit allows you to edit the current observation. This button is disabled if you are not viewing a existing, saved record or if you do not have permissions to edit the record you are currently viewing. |
| • | Delete allows you to delete the current observation. In order to delete an observation, the observation must be in edit mode. A confirmation screen will require you to enter the Observation ID in order to confirm the deletion. Deletions are permanent and cannot be undone without a full database recovery. |
Entering Observation Data
To enter a new observation, follow these steps:
Note: Fields marked with an asterisk (*) are required.
Field may be labeled differently than this help guide based on custom language settings.
| 1. | Click on the calendar icon next to the Date text box and select the observation date. Date is always a required field. |
| 2. | If Time of Day is enabled in the Application Settings, enter the time of the observation or click the Now button to enter the current time. |
| 3. | If People Observed is enabled in the Application Settings, then enter the number of people that were observed. |
| 4. | Select the observer from the Observer drop-down list. The list of observers can be edited from the Observers list in the Variables sub-menu. |
| 5. | Enter the other variables in the same manner that the Observer was selected. Variable selections may be set as defaults in the User Settings screen. |
| 6. | In the checklist area, enter the Safe and Concern/At-Risk information. If using check-marks on the observation card then enter a 1. Clicking on the Safe or Concern fields will enter a number. |
| 7. | Enter the Comments if required. Depending on the settings, up to two comment fields and a comment category drop-down list will be visible. Pressing Enter in the comment fields will start a new line. Press tab to move to the next field. |
| 8. | Enter the Observer Comment and/or a Worker Comment at the bottom if applicable. |
| 9. | Click the Submit Observation button to the save the observation record. A notification will appear at the top of the screen letting you know either that the observation was submitted successfully, or that changes need to be made before the observation can be submitted. |
| 10. | The screen will automatically clear for a new Observation. |
Observation records can be edited and deleted. To accomplish this, navigate to the appropriate record then either delete the record by clicking the Delete button or click the Edit button to modify the record manually and save your changes.