|
<< Click to Display Table of Contents >> Report Data Filtering |
  
|
|
<< Click to Display Table of Contents >> Report Data Filtering |
|
Data filtering allows a report to be run to include only data that matches the specified criteria. Any combination of data filters may be specified.
By default, reports include all data unless a filter is specified.
Leaving a specific variable filter unspecified will include data associated to all values of the variable. For example, if no Behavior filter is specified then data from all Behaviors will be included in the report.
Once a variable filter is specified, only data that corresponds to the selected items will be included in the report. For example, if Observer "John Smith" is specified then only data collected by that observer will be included in the report.
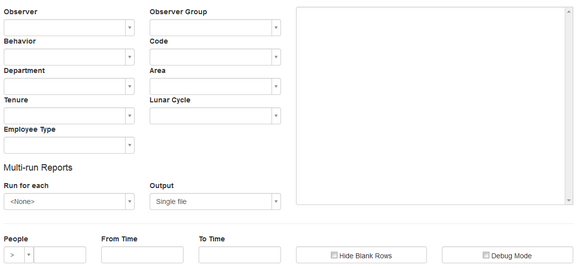
Adding Filters
| 1. | Select the drop-down list that appears below the desired filter type. The drop-down list will display each of the variable items. |
| 2. | Select each item you wish to include in the report. Each selection will appear in the Report Criteria box to the right. |
Removing Filters
To remove a filter simply click on the item in the Report Criteria list on the right. To remove multiple items in a group simply click on the header and the entire group will be removed.
Filter Items
|
Master Mode only. Reports will include only data from specified site dataset or group of sites belonging to specified Regions. |
||
|
The Category filter works in conjunction with the Checklist filter. When the Category filter is used, reports are based on only the Behaviors that belong to that category. In reports that list Behaviors, only Behaviors that belong to the selected Category will be listed. |
||
|
The Behavior filter limit the data included to the specified Behavior(s). Reports that list Behaviors will display only the selected Behavior(s). |
||
|
This filter is used to generate a report based on data observed by a specific Team of Observers. Using this filter with the Observer Management report will show only the Observers belonging to the specified group(s). |
||
|
This filter is used to generate a report based on data observed by the Observer(s). |
||
|
User-Defined Variables can be modified in the Application Settings. This filter behaves similarly to the Location filter. |
||
|
This filter allows users to enter a time range. Reports will be based on data with Observation Times falling between the values specified. Users may enter time ranges that span midnight or leave one or both time ranges blank to include all times. |
||
|
The People filter will allow for a report to include only data with a specific number or range of people observed. This is useful for separating individual from group observations. |
||
|
The Comment Code is used to generate a report with only data containing the specified Comment Code. This filter only applies to reports that tabulate Comment data. |
||
|
Enabling this report option will prevent the report from displaying items with no associated data. |
||
|
Debug mode is intended to provide NuDatum with additional debug information about the report when troubleshooting. It is unnecessary to select this option unless instructed to do so by NuDatum customer support. |
||
Multi-Run Reports
These options allow multiple reports to be automatically generated for each item in a variable list.
|
The run for each option allows selection of the variable list to use when generating the reports. The current report criteria will be run with each item in the selected variable list. For example, if a variable named "Departments" is selected then multiple reports will run, one for each department. |
||
|
This option determines the output type of the multi-run reports. There are two options available. Single file will merge the reports together into a single output file. Multiple files in zipped folder will keep each report separated and placed into a single zipped folder. |
Saved Reports
Report criteria can be saved for future use. To save report criteria, enter the desired criteria and click the Save button at the bottom of the screen. You will be prompted for a name for the criteria. Enter a meaningful name for the criteria and click Save.
To retrieve saved criteria, expand the drop-down list at the bottom of the Report Options screen. The list of saved report criteria available to you will be displayed. Click on the report you wish to load, and the criteria will be loaded automatically. Note that this will overwrite any existing criteria you have entered.
Saved report criteria can be modified by loading the criteria, making the desired changes to the criteria, then clicking the Save button. Optionally, you can enter a new name for the criteria. Click Save when finished.
A new saved report can be created based on an existing saved report. Load the report criteria then make any desired changes. When you are ready to save, expand the drop down list and choose the < New > option. Click Save, enter a name for the criteria, and click Save to submit the new criteria.
To delete a saved report, load the report by selecting it from the drop-down list then click Delete. You will be prompted to enter the ID of the saved report to confirm deletion. After entering the ID in the text box, click Delete to permanently delete the saved report. Note that deleting a saved report is permanent, and cannot be undone.